July 11, 2012
Quinoa may cook quickly, but taking it from harvest to the saucepan for cooking is an arduous process. The next harvest will be easier for me because I’ve learned what works and the tools I need to process the seed heads.
You can read about the Sunset garden writers’ experience with processing quinoa on Westphoria (Part 1, Harvesting) and Part 2 (Threshing) and Part 3 (Winnowing). Salt Spring Seeds has excellent information on growing and harvesting quinoa. This post may be more than you want to know about processing quinoa.

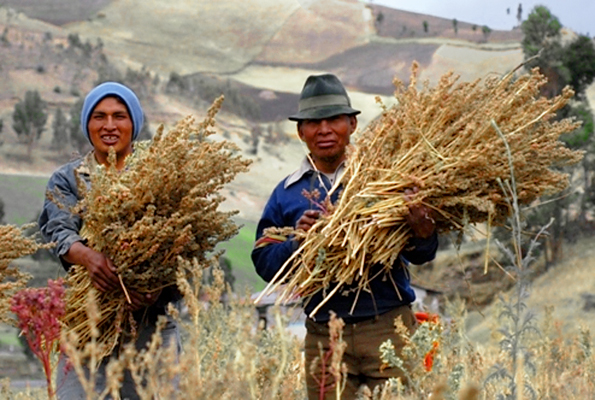
Certified fair trade quinoa producers in Ecuador. Photo credit: Wikimedia Commons
My harvest was not so bountiful as I only devoted ten square feet of garden space to quinoa. I also let some wind poppy meander around the quinoa which may have been unnecessary, but beautiful competition. I planted seed about four inches apart in a grid and let the strongest survive amidst the competing quinoa and wind poppies. Next time I might plant even closer and extract any invaders. Here’s my meager harvest. The yield however was ¾ pound of cleaned seed.
Some of the quinoa stalks blew over before the seed head developed fully. A few collapsed under the weight of the seed head and did not progress to maturity. I had to stake most of the stalks On yesterday’s post where quinoa is shown growing in Peru, the plants seem to be quite close together and may help support each other. This may be important as the leaves fall and the bare stalks persist and the heavy seed head begins to dry.
I was trying to dry my quinoa during “May Gray” and “June Gloom.” To intensify the heat from the sun and speed the process, I used a technique developed by ECHO for drying beans to preserve the vitamin A. A leftover piece of our metal roofing was positioned over the tray of harvested quinoa. It also kept the night moisture off the seed heads, though many foggy nights I brought the trays in the house. Birds and rodents don’t like the seeds because of the bitter saponin (a tannin) that coats the seed.
Thresh: to separate seed from a harvested plant mechanically. Some sources report shaking the seed heads in a paper bag to collect the seed. I found too much of the chaff (the seed coverings and other debris) landed with quinoa seed and I didn’t get all of the quinoa. So instead I rubbed the seed from the stalks into a container. Still a lot of debris accumulated as you’ll see later but I extracted more seed. than with the bag method.
Here’s the threshed quinoa, with debris–a thin layer on a 15x11 inch tray.
Here’s where I began trying to sift some of the debris from the seed using various strainers I had in the kitchen. This small one above worked fairly well. My processing of the quinoa was interrupted and when I returned home my husband had taken up the task using a sifter retrieved from the trash during grad school. It had been with a display of other antique scientific tools in our bookcase.
In no time at all (it seemed), he sifted the rest of the quinoa, removing the larger debris. The seeds fell through the screen along with the smallest debris pieces. It’s nice to have a scientist around the house.
The “sifted” quinoa seed. Looks pretty clean, but it isn’t as you’ll see soon.
Winnow: to remove (as chaff) by a current of air. With a stiff ocean breeze on our patio I trialed winnowing. This was going to take too long. The Sunset garden women used a fan for winnowing in the test kitchen late at night. They reported the fan worked, but covered the kitchen with quinoa debris. I couldn’t get into that.
Here’s what the quinoa looked like up close before the next step. As I mentioned earlier, the bitter saponin has to be rinsed from the seed. I hypothesized that when the seed mixture was put in water, the chaff would rise to the top and the seed would sink. I tested my hypothesis with a small sample and it worked. Hence, I sort of skipped the winnowing step.
I gently pushed a fork through the debris layer to release the seeds to sink to the bottom, then lifted the debris layer out to discard. Then began the intensive rinsing. I probably rinsed the quinoa–enough for our dinner–about one cup, ten times, until the water was clear. I poured off the rinse water and chaff just until the seed would start to flow. (Water went to container plants on the patio).
I stirred the rinse water vigorously to release any chaff from the seed and agitate the seed to help remove the saponin.
The saponin filled rinse water was used by native peoples to wash their clothes and as a laxative. Good to remove as much of the saponin as possible for taste and…
With most of the debris removed, I was ready to cook the quinoa. I used one cup quinoa to two cups water and a teaspoon of chicken base. I read later that dry roasting (previously dried) quinoa adds a nuttier flavor. It took longer to cook than expected, about 25 minutes to be ready to serve.
Quinoa served. It was delicious. I usually prefer the red quinoa flavor, but this surpassed any of the purchased quinoa I’ve eaten–tender, flavorful and very nutritious, I’m sure. From planted seed to the seed I’m eating, I know every step.
Yield from ten square feet of quinoa: ¾ pound. Now I know why it is at least five dollars a pound at the store. Will I plant quinoa next year? Probably, but I may ponder that decision for awhile.


